Posted on Leave a comment

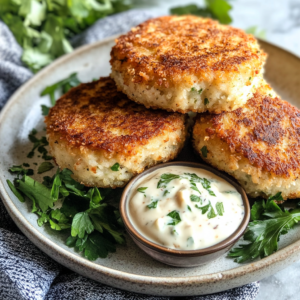
Perfectly Easy Crab Cakes:


Perfectly Easy Crab Cakes: A Complete Guide

Creating the perfect crab cake is a balance of fresh ingredients, minimal filler, and the right cooking method. This guide takes you step-by-step through each stage of crafting crab cakes that are easy and delicious.


Why Perfectly Easy Crab Cakes?

For seafood lovers, a good crab cake showcases the delicate and sweet flavor of fresh crab without overwhelming it. The appeal of this dish lies in its simplicity. If you’re new to seafood or exploring different seafood recipes, you might also enjoy pairing these crab cakes with sides from our guide to Easy Balsamic Salmon Salad for a fresh and light meal.


Choosing the Best Crab Meat for Crab Cakes

Quality crab meat is essential to achieving the right texture and flavor for crab cakes. Here’s a breakdown of popular options:

  • Lump Crab Meat: This has large, firm pieces and is slightly sweet, making it perfect for crab cakes that rely on minimal filler.
  • Claw Meat: While more affordable, claw meat is stronger in flavor and works best in more seasoned dishes.

For those interested in experimenting with other flavors and textures in seafood, our Brown Butter Lobster Rolls article has tips for handling delicate shellfish without losing texture or taste.


Essential Ingredients for Perfect Crab Cakes

Crafting delicious crab cakes with the right ingredients is the secret to balanced flavors and a sturdy structure. Here’s what you’ll need:

Key Ingredients

  • Crab Meat: The main ingredient and focus. For best results, use lump or backfin crab meat.
  • Breadcrumbs: Helps bind the mixture. Panko is a good choice for a lighter, crispier cake.
  • Mayonnaise: Adds richness without overpowering the crab’s flavor.
  • Old Bay Seasoning: Essential for authentic flavor; pairs well with crab’s natural sweetness.
  • Egg: Binds the ingredients together, helping the crab cakes hold their shape.

For more seafood flavor inspiration, check out our Creamy Clam Chowder recipe, which showcases how to enhance subtle seafood flavors without overwhelming them.


Step-by-Step Guide to Making Perfectly Easy Crab Cakes

Each step in the process is crucial to achieving a crab cake that holds its shape and highlights the crab’s natural flavor.

1. Preparing the Crab Meat

  • Check for Shells: Gently pick through the crab meat to remove any shells.
  • Pat Dry: Moisture can make the cakes fall apart; pat the crab dry before mixing.

2. Mixing the Ingredients

Combine ingredients gently to avoid overmixing, which can lead to dense crab cakes. If you’re craving a similar seafood dish, our Quick Easy Sea Bass with Avocado Salsa might be a great option to add variety to your meals.

3. Shaping the Crab Cakes

Using about ¼ cup of mixture per cake, form into even patties. Chill in the refrigerator for 30 minutes to help the cakes stay together during cooking.

4. Cooking Methods: Pan-Fried, Baked, or Air-Fried

Each method offers a unique texture. Choose based on your preference:

  • Pan-Frying: Provides a crispy exterior and moist interior. Heat oil in a skillet and cook for 3-4 minutes on each side.
  • Baking: Bake at 375°F (190°C) for 15-20 minutes, resulting in a tender crab cake.
  • Air-Frying: This is a low-oil option that still gives a crunchy texture. Cook for 10-12 minutes at 370°F, flipping halfway through.

Tips for Perfect Texture and Flavor

Here are some expert tips to get the best results:

  • Minimal Filler: Avoid adding too many breadcrumbs or mayonnaise to keep the flavor of the crab prominent.
  • Don’t Overcook: Whether pan-frying or baking, watch closely to avoid drying out the crab cakes.

If you’re interested in experimenting with flavors, check out our recipe for Cajun Chicken Drumsticks to explore more ways to use seasonings effectively.


Variations on Traditional Crab Cakes

Switch things up with these variations:

  • Gluten-Free Crab Cakes: Substitute gluten-free breadcrumbs for a delicious alternative that doesn’t sacrifice texture.
  • Spicy Crab Cakes: Add a touch of hot sauce or diced jalapeño for heat.
  • Maryland-Style Crab Cakes: Known for minimal filler and a focus on lump crab meat, these are a favorite for seafood purists.

Perfect Sides and Sauces for Crab Cakes

Pairing your crab cakes with the right side dish elevates the meal. Here are some great options:

  • Tartar Sauce: Classic choice that complements crab’s natural sweetness.
  • Coleslaw: Offers a refreshing contrast in texture.
  • Fresh Lemon Wedges: A squeeze of lemon juice brings out the delicate flavor of crab.

If you’re preparing a seafood-focused meal, consider adding our Easy Creamy Crab Salad as a side for a well-rounded plate.


FAQs About Crab Cakes

Here are answers to common questions:

How can I make crab cakes without them falling apart?

Make sure to include enough binding agents like eggs and breadcrumbs, and chill the cakes before cooking.

Can I freeze crab cakes?

Yes, freeze uncooked crab cakes on a lined baking sheet, then store in an airtight container. Cook directly from frozen or thaw in the fridge.

How do I make gluten-free crab cakes?

Use gluten-free breadcrumbs, which hold up well in this recipe.

For more helpful seafood cooking tips, check out our guide to Healthy Baked Chili Lime Salmon, which offers additional techniques for keeping seafood moist and flavorful.


Conclusion

Creating perfectly easy crab cakes requires quality ingredients, minimal filler, and careful handling. With these tips, you’ll be making crab cakes that rival restaurant versions. Experiment with these methods, and pair them with sides and sauces for a memorable meal.

Posted on Leave a comment

Thai Red Shrimp Curry Recipe


Thai Red Shrimp Curry Recipe

Thai Red Shrimp Curry is a rich, flavorful dish combining succulent shrimp, creamy coconut milk, and aromatic red curry paste. This dish is an excellent choice for a quick, satisfying meal that brings the taste of Thai cuisine right to your home.


Introduction to Thai Red Shrimp Curry

Thai cuisine is renowned for balancing flavors like sweet, spicy, and sour, making it uniquely complex and satisfying. Thai Red Curry combines these elements, offering a robust taste profile that complements tender shrimp. This recipe is simple yet provides the authentic flavor you would expect from a Thai restaurant. For more seafood inspiration, try our Cilantro Lime Shrimp Tacos, a quick and flavorful meal perfect for any occasion.

A key component in Thai red curry is coconut milk, which adds creaminess to the dish and balances the spices. If you’re curious about other coconut milk-based recipes, check out our Creamy Clam Chowder, which also highlights coconut milk’s smooth texture in a seafood context.


Key Ingredients for Thai Red Shrimp Curry

Supporting Ingredients

  • Fish Sauce: A must-have in Thai cooking, adding depth to the curry’s flavor. For an alternative umami experience, explore our Garlic Butter Steak Bites, which uses similar flavor enhancers.

Cooking Techniques

Follow these steps for cooking an authentic Thai curry that boasts rich flavors and perfect textures.

Step-by-Step Cooking Instructions

  1. Sauté the Curry Paste: Start by sautéing the red curry paste to enhance its flavor.
  2. Add Coconut Milk: For a creamy, rich base, use coconut milk. For another creamy seafood dish, try our Easy Creamy Crab Salad, which highlights how creaminess pairs beautifully with seafood.

Avoid Overcooking the Shrimp

Shrimp cooks quickly and can become rubbery if overcooked, so keep an eye on the timing for the best texture.


Serving Suggestions

Traditional Sides

  • Jasmine Rice: Pairing this dish with jasmine rice allows the flavors to shine.
  • Rice Noodles: If you prefer noodles, our Healthy Baked Chili Lime Salmon is another option that pairs well with a variety of grains or noodles.
Posted on Leave a comment

Easy Balsamic Salmon Salad Recipe

Easy Balsamic Salmon Salad combines tender, flaky salmon with tangy, sweet balsamic glaze and fresh greens for a delicious, well-balanced meal. It’s perfect for a quick lunch or light dinner that’s both healthy and satisfying. This recipe keeps things simple yet flavorful, with easy preparation and minimal ingredients to enhance both taste and nutrition.


Introduction to Easy Balsamic Salmon Salad

This balsamic salmon salad combines rich salmon with crisp greens and a tangy balsamic glaze, creating a nutritious, well-rounded meal that’s easy to prepare. The balsamic glaze adds a tangy sweetness, balancing the salmon’s rich flavor while tying all the ingredients together. For more ideas on how to prepare fish with fresh flavors, try our Quick and Easy Sea Bass with Avocado Salsa, a dish that highlights light, fresh ingredients perfect for any occasion.

Salmon is well-known for being rich in protein and heart-healthy omega-3s, and balsamic vinegar is packed with antioxidants. For more on salmon’s benefits, explore our Healthy Baked Chili Lime Salmon, which offers a similar blend of flavors for a nutritious and quick meal.


Key Ingredients for Balsamic Salmon Salad

Here are the essential ingredients that make this recipe nutritious and flavorful.

Primary Ingredients

  • Salmon Fillets: Fresh or frozen salmon work well, with wild-caught salmon preferred for its flavor.
  • Balsamic Vinegar: Adds sweetness and depth, balancing the richness of the salmon.
  • Mixed Greens: Use a blend of baby spinach, arugula, and romaine for varied texture.
  • Cherry Tomatoes: Provide a pop of sweetness and vibrant color.
  • Red Onion: Sliced thinly, red onion adds a mild sharpness to balance the glaze.

Supporting Ingredients

  • Olive Oil: Adds a smooth richness to both the glaze and the salad.
  • Honey: Sweetens and thickens the glaze for a perfectly balanced tang.
  • Dijon Mustard: Helps the dressing emulsify, adding depth.
  • Garlic: Adds a savory note to the glaze.

Optional Toppings

  • Avocado: Creamy and rich in healthy fats, avocado is a great addition.
  • Feta or Goat Cheese: Adds tang and a touch of creaminess.
  • Toasted Nuts: Pecans or almonds add a satisfying crunch.

Preparing the Balsamic Glaze

A homemade balsamic glaze elevates this salad, offering a rich, tangy flavor that perfectly complements salmon.

Steps for the Balsamic Glaze

  1. Combine Ingredients: In a small saucepan, mix balsamic vinegar with honey and a pinch of salt. Bring to a simmer over medium heat.
  2. Reduce Heat and Thicken: Lower the heat and let the mixture reduce, stirring until it thickens.
  3. Cool Before Using: Allow the glaze to cool slightly, reaching a syrupy consistency for drizzling.

Using Store-Bought vs. Homemade Glaze

  • Homemade Benefits: Homemade glaze allows control over sweetness and consistency.
  • Adjusting Store-Bought Glaze: For a thicker consistency, reduce store-bought glaze on low heat with a dash of honey.

For more tips on enhancing flavors, see our recipe for Caprese Stuffed Portobello Mushrooms, which uses balsamic for an extra flavor boost.


Cooking Techniques for Salmon

Properly cooked salmon adds a tender, flaky texture that balances well with crisp salad greens.

Grilling the Salmon

  • Preheat Grill: Lightly oil grill grates and preheat to medium-high.
  • Grill Time: Grill skin-side down for 4-5 minutes per side or until it flakes easily.

Pan-Seared Salmon

  • Heat the Pan: Use a non-stick skillet over medium-high heat with a tablespoon of olive oil.
  • Crispy Skin: Start with the skin-side down, cooking for 4-5 minutes, then flip and cook until golden brown.

Baking for Tender Results

  • Preheat Oven: Set oven to 400°F (200°C).
  • Baking Instructions: Place salmon on a baking sheet and bake for 12-15 minutes, depending on thickness, until the fish is opaque and flaky.

Broiling for a Quick Option

  • Quick Browning: Broiling caramelizes the glaze on top of the salmon.
  • Broiling Tips: Broil close to the heat source for 5-7 minutes, watching carefully to avoid burning.

For more seafood techniques, see our Beer Battered Fish and Chips, which provides a different cooking approach for a classic dish.


Assembling the Balsamic Salmon Salad

Assembling the ingredients thoughtfully ensures a beautiful and delicious presentation.

Layering Ingredients

  • Start with Greens: Begin with a base of mixed greens in a large bowl or on a serving plate.
  • Add Vegetables: Scatter cherry tomatoes and red onion slices across the greens.
  • Position the Salmon: Place the cooked salmon fillet on top as the focal point.

Drizzling with Balsamic Glaze

  • Drizzle the Glaze: Use a spoon or squeeze bottle to drizzle the balsamic glaze over the salmon and salad.
  • Tossing Option: For a more integrated flavor, toss the greens lightly with a bit of glaze before layering.

Serving Options

  • Main Course: Serve as a complete meal with optional toppings for extra richness.
  • Side Salad: For a lighter option, use smaller portions as a side dish.

Health Benefits of Salmon and Balsamic Vinegar

This salad offers a variety of nutrients that support health, making it both delicious and beneficial.

Salmon’s Nutritional Profile

  • Omega-3 Fatty Acids: These healthy fats support heart health, reducing inflammation and improving brain function.
  • Protein and Vitamins: Salmon provides vitamin D, B12, and quality protein for muscle maintenance and immune support.

Antioxidants in Balsamic Vinegar

  • Antioxidant Boost: Balsamic vinegar contains antioxidants, which combat oxidative stress.
  • Digestive Health: Its acidity helps with digestion, enhancing the overall meal.

Nutritional Value of Salad Ingredients

  • Mixed Greens: High in vitamins A, C, and K, greens add fiber for digestive support.
  • Tomatoes and Red Onion: These vegetables provide antioxidants and natural sweetness.

For another protein-rich salad, consider our Flourless Peanut Butter Banana Muffin, which complements this dish with a naturally sweet option.


Variations of Balsamic Salmon Salad

This recipe can be customized in many ways, allowing you to adjust flavors to your preference.

Adding Seasonal Fruits

  • Strawberries or Apples: Adds a touch of sweetness and pairs well with balsamic.
  • Oranges or Grapefruit: Citrus fruits bring a refreshing, tangy flavor.

Dairy Additions

  • Feta Cheese: Adds a tangy, creamy note that pairs well with balsamic.
  • Goat or Blue Cheese: For extra richness, crumble over the top.

Vegetarian Alternatives

  • Grilled Tofu: Substitute grilled tofu for a plant-based option.
  • Roasted Chickpeas: Adds a crunch and protein, making it a hearty alternative.

Frequently Asked Questions (FAQs)

Here are answers to some commonly asked questions about making balsamic salmon salad.

Can I use frozen salmon?

Yes, frozen salmon works well. Thaw it in the fridge overnight before cooking.

How do I keep the salmon from drying out?

Avoid overcooking by monitoring cooking time and cooking skin-side down when pan-searing or grilling.

What’s the best way to make a thicker balsamic glaze?

Reduce balsamic vinegar on low heat until thickened, stirring occasionally. Adding honey enhances viscosity.

How do I store leftovers?

Store leftover salmon and greens separately in airtight containers. Reheat salmon gently to avoid drying out.

Can I make this salad keto-friendly?

Yes, it’s low in carbs. For keto adjustments, omit sweeteners and higher-carb toppings.

How do I prevent the greens from wilting?

Serve immediately after assembling, and avoid overdressing the greens.


Conclusion

Easy Balsamic Salmon Salad brings together tender salmon, crisp greens, and a tangy balsamic glaze for a beautiful, healthy meal. This salad is customizable and nutrient-packed, making it perfect for any occasion. For more vibrant seafood recipes, try our Cilantro Lime Shrimp Tacos, which offers another blend of fresh ingredients and bold flavors.

Posted on Leave a comment

Quick and Easy Sea Bass with Avocado Salsa Recipe

Quick and Easy Sea Bass with Avocado Salsa Recipe

Quick and Easy Sea Bass with Avocado Salsa combines the mild, flaky texture of sea bass with a vibrant, creamy avocado salsa. This dish is perfect for a healthy, flavorful dinner that’s ready in less than 30 minutes. With minimal ingredients and straightforward preparation, it’s ideal for busy weeknights or elegant dinners alike.


Introduction to Quick and Easy Sea Bass with Avocado Salsa

Sea bass has a buttery, mild flavor that pairs wonderfully with the bright acidity and creaminess of avocado salsa. The salsa’s combination of fresh tomatoes, onions, cilantro, and lime juice brings out the best in this seafood dish. This recipe keeps things simple, so even beginners can create a beautiful meal. For more seafood inspiration, check out our Healthy Baked Chili Lime Salmon, another quick and vibrant fish recipe perfect for weeknight dinners.

This dish is not only visually stunning but also packed with nutrients. Sea bass is high in protein and omega-3 fatty acids, while avocado provides heart-healthy fats and fiber. For an easy pairing, our Easy Baked Sweet Potato makes a perfect side dish to round out this nutritious meal.


Key Ingredients for Sea Bass with Avocado Salsa

Each ingredient in this recipe brings unique flavors and health benefits to the table.

Primary Ingredients

  • Sea Bass Fillets: Fresh or frozen sea bass fillets work well. Look for sustainably sourced options for the best flavor and quality.
  • Ripe Avocados: Choose ripe avocados to achieve a creamy texture in the salsa. For more on picking the perfect avocado, visit Avocado Central.
  • Tomatoes: Adds sweetness and juiciness, balancing the rich avocado and fish.
  • Red Onion: Brings a mild, crunchy bite that enhances the salsa.
  • Lime Juice: Essential for acidity, it lifts the flavors and prevents the avocado from browning.

Supporting Ingredients

  • Olive Oil: Adds subtle richness when cooking the fish.
  • Cilantro: Fresh cilantro adds a burst of herbal flavor and color.
  • Salt and Pepper: Essential seasonings to bring out the natural flavors of the ingredients.

Optional Ingredients

  • Jalapeño: For those who enjoy a bit of spice, finely diced jalapeño adds a kick to the salsa.
  • Garlic Powder: Adds a hint of depth to the sea bass without overpowering it.

Preparing and Seasoning the Sea Bass

For a deliciously tender and flavorful sea bass, proper seasoning and handling are essential.

Marinating and Seasoning Options

  • Basic Seasoning: Salt, pepper, and a touch of lime juice complement the sea bass, allowing its natural flavor to shine.
  • Savory Marinade: For more depth, try a quick marinade with olive oil, a dash of soy sauce, and a sprinkle of garlic powder.

Handling and Storing Fresh Sea Bass

  • Storage Tips: Keep sea bass refrigerated until cooking. If using frozen fillets, thaw overnight in the fridge for even cooking.
  • Pat Dry: Use paper towels to pat the sea bass dry before seasoning, which helps achieve a nice sear.

For more on handling seafood, see our guide to Creamy Clam Chowder, which includes helpful tips for maintaining freshness in seafood-based dishes.


Cooking Techniques for Sea Bass

Sea bass is versatile and can be cooked in several ways to suit your preference.

Grilling the Fish

  • Preheat the Grill: Lightly oil the grill grates and preheat to medium-high heat.
  • Grilling Instructions: Place sea bass skin-side down and grill for 4-5 minutes per side, until opaque and easily flaked with a fork.
  • Charred Flavor: Grilling imparts a subtle smoky flavor, enhancing the sea bass’s natural taste.

Pan-Searing

  • Heat a Skillet: Use a non-stick skillet over medium-high heat with a drizzle of olive oil.
  • Crispy Skin: Start with the skin-side down, cooking for 4-5 minutes, then flip and cook for another 2-3 minutes to finish.

Oven-Baking

  • Preheat the Oven: Set oven to 400°F (200°C).
  • Baking Time: Place seasoned fillets in a baking dish and bake for 10-12 minutes, until flaky and opaque.
  • Low Effort, High Reward: Baking offers a convenient, hands-off approach that keeps the fish tender.

Each method has its own flavor benefits. Grilling adds smokiness, pan-searing gives a crispy skin, and baking is reliable and hands-off. For more dinner ideas, our One Pot Chicken Broccoli Rice is another easy option for busy nights.


Making the Avocado Salsa

The avocado salsa is a fresh, creamy counterpart to the mild sea bass, and it’s quick to prepare.

Preparing the Salsa Ingredients

  • Dice the Avocado: Cut into small, even cubes for a smooth, chunky salsa.
  • Chop Tomatoes and Onions: Dice to a similar size for a balanced texture.
  • Add Lime and Cilantro: Toss with lime juice and fresh cilantro for acidity and flavor.

Mixing and Adjusting Flavor

  1. Combine Ingredients: Mix avocado, tomatoes, onions, cilantro, and lime juice in a bowl.
  2. Season to Taste: Add salt, pepper, and optional jalapeño. Adjust lime juice to taste.
  3. Gently Stir: Mix gently to avoid mashing the avocado.

Storing the Salsa

  • Prevent Browning: Add a layer of lime juice on top and cover with plastic wrap to keep fresh and prevent browning.

If you love herb-forward flavors, try our Caprese Stuffed Portobello Mushrooms, which also feature vibrant herbs and fresh ingredients.


Assembling and Serving Sea Bass with Avocado Salsa

Presentation adds to the experience, making this dish perfect for entertaining or a special night in.

Plating Suggestions

  • Serve on a Bed of Salsa: Spread avocado salsa on the plate and place the sea bass fillet on top for a restaurant-style presentation.
  • Salsa on the Side: Serve the salsa on the side for a more casual approach, allowing diners to add as desired.

Garnishing Options

  • Fresh Cilantro: Garnish with chopped cilantro for color and flavor.
  • Lime Wedges: Serve lime wedges for an extra acidic kick.
  • Jalapeño Slices: Add jalapeño for a bit of heat and color contrast.

Pairing Ideas

  • Simple Sides: Serve with rice, quinoa, or a fresh green salad for a balanced meal.
  • Low-Carb Options: For a keto-friendly meal, pair with roasted vegetables or cauliflower rice.

Health Benefits of Sea Bass and Avocado Salsa

This dish is packed with nutrients, offering numerous health benefits.

Nutritional Profile of Sea Bass

  • High Protein, Low-Calorie: Sea bass is a great source of lean protein while being low in calories.
  • Rich in Omega-3 Fatty Acids: Omega-3s support heart health, reduce inflammation, and aid brain function.

Benefits of Avocado

  • Heart-Healthy Fats: Avocado provides monounsaturated fats that help maintain healthy cholesterol levels.
  • Fiber and Vitamins: Avocado is high in fiber, potassium, and vitamins C, E, and K, making it a nutritious addition.

Low-Carb and Keto-Friendly

This dish fits well within low-carb and keto diets, especially when paired with vegetable sides. For more low-carb recipe ideas, try our Flourless Peanut Butter Banana Muffin, a healthy dessert option to end your meal.


Frequently Asked Questions (FAQs)

Below are common questions about making sea bass with avocado salsa.

Can I use frozen sea bass?

Yes, but be sure to thaw it in the refrigerator overnight before cooking.

How do I keep avocado salsa fresh?

To prevent browning, add lime juice and store tightly covered with plastic wrap.

Is sea bass with avocado salsa keto-friendly?

Yes, this dish is low-carb, especially when served with vegetable-based sides.


Conclusion

Quick and Easy Sea Bass with Avocado Salsa offers a fresh, healthy meal that’s easy to prepare. With flavorful sea bass and creamy avocado salsa, this dish is perfect for any occasion, whether a weeknight dinner or a special meal. Serve with complementary sides, and explore our Cilantro Lime Shrimp Tacos for another vibrant seafood dish to add to your collection.

Posted on Leave a comment

Beer Battered Fish and Chips Recipe


Beer Battered Fish and Chips Recipe

Beer Battered Fish and Chips offers a classic combination of golden, crispy fish and perfectly cooked chips, beloved worldwide but rooted in British tradition. This recipe focuses on creating a light, crunchy batter that encases tender white fish, with beer adding a unique, airy texture. Paired with thick-cut fries, this dish is an iconic pub favorite you can recreate at home.


Introduction to Beer Battered Fish and Chips

Beer battered fish and chips is more than a meal; it’s a culinary experience that combines texture and flavor in each bite. By using carbonated beer in the batter, you get a light, crispy coating that seals in the fish’s moisture while remaining airy. Beer’s carbonation is crucial to achieving that sought-after crunch. If you’re interested in learning about traditional cooking techniques, check out our guide to British pub cuisine on BBC Good Food.

Choosing the right type of fish is essential. Cod or haddock are the most common choices, as their mild flavor and firm texture withstand frying. For a lighter twist on pub-inspired dishes, try our Healthy Baked Chili Lime Salmon, which is full of flavor with a tangy twist.


Key Ingredients for Beer Battered Fish and Chips

Achieving the perfect balance of flavor and texture starts with the right ingredients.

Primary Ingredients

  • White Fish Fillets: Use fresh, mild white fish like cod or haddock for the best texture and flavor.
  • Beer: Light beers, like pale ales or lagers, work well for creating a batter that’s light and crispy.
  • Potatoes: Russet or Yukon Gold potatoes are ideal for making thick, crispy chips.

Additional Ingredients

  • Flour and Baking Powder: Essential for a light batter, with baking powder adding extra lift.
  • Seasonings: Salt, pepper, and garlic powder enhance the overall taste of the dish.
  • Optional Tartar Sauce Ingredients: Mayonnaise, lemon juice, capers, and pickles create a tangy dipping sauce for the fish.

Alternative Ingredients

  • Non-Alcoholic Substitutes: Club soda or sparkling water can be used instead of beer to achieve a similar effect.

For a rich, garlic-infused twist, check out our Cajun Garlic Butter Steak Bites, which also use a flavorful, high-heat cooking method.


Preparing the Beer Batter

The key to crispy beer battered fish is a well-made batter. Here’s how to achieve a smooth, light texture.

Selecting the Right Beer

  • Light Beer: Opt for pale ales or lagers, as they add flavor without overwhelming the fish. Darker beers can add a bolder taste but may weigh down the batter.

Mixing the Batter

  1. Combine Dry Ingredients: In a bowl, mix flour, baking powder, and seasonings.
  2. Add Beer Gradually: Slowly pour in the beer while whisking until smooth and thick.

Batter Consistency Tips

  • Thick, but Pourable: The batter should coat the fish without dripping excessively.
  • Chilling the Batter: Letting the batter chill for 10-15 minutes before frying enhances crispiness.

For expert frying tips, visit Serious Eats to learn how to achieve the perfect golden crust in fried foods.


Preparing the Fish and Chips

Both the fish and chips need specific preparation to ensure they fry up golden and crispy.

Preparing the Fish

  • Dry the Fish: Pat fish fillets dry with paper towels to help the batter stick.
  • Season the Fillets: Season lightly with salt and pepper before battering.
  • Chill Until Ready: Keeping the fish cold before frying helps achieve a light, crispy coating.

Preparing the Chips

  1. Cut the Potatoes: Cut potatoes into thick, even slices for consistent cooking.
  2. Soak in Cold Water: Soak the potatoes for at least 30 minutes to remove excess starch, which helps achieve crispiness.
  3. Blanch the Chips: Blanching in oil at a lower temperature before the final fry ensures a soft inside and crispy exterior.

For a hearty side, consider serving these with our Easy Baked Sweet Potato, which offers a flavorful, healthier twist on traditional fries.


Frying Techniques for Fish and Chips

Perfect frying is essential for achieving that sought-after crispy texture.

Choosing the Right Oil

  • High-Smoke Point Oils: Oils like vegetable, peanut, or canola oil can withstand high heat without breaking down, making them ideal for deep frying.

Maintaining Oil Temperature

  • Monitor Temperature: Keep oil at 375°F to prevent sogginess and ensure the fish fries up golden brown. Using a thermometer can help maintain consistency.

Frying Fish and Chips Separately

  1. Start with Chips: Fry chips until golden, then set aside.
  2. Fry the Fish: Dip the fish in batter, allowing excess to drip off, and fry until golden brown (about 3-4 minutes per side).
  3. Re-Fry Chips: Give chips a final fry to achieve maximum crispiness.

Draining and Serving

  • Drain on Paper Towels: Use paper towels to absorb excess oil, which helps prevent greasiness.
  • Serve Hot: Fish and chips are best served immediately for optimal crispiness.

Serving Suggestions and Accompaniments

Accompanying your fish and chips with the right sides enhances the dish.

Classic Accompaniments

  • Tartar Sauce: Made with mayonnaise, lemon, capers, and pickles, tartar sauce complements the fish’s richness.
  • Malt Vinegar: For a traditional British touch, serve malt vinegar alongside for dipping.
  • Lemon Wedges: A squeeze of lemon brightens the dish and balances the flavors.

Traditional Sides

  • Peas or Mushy Peas: A mild side that pairs well with the crispy fish.
  • Coleslaw: Adds a creamy, crunchy contrast to the fried fish.

Beverage Pairings

  • Beer Pairings: Serve with a light beer or pale ale to match the beer batter.
  • Non-Alcoholic Option: Sparkling water or lemonade adds a refreshing balance to the rich flavors.

For a sweet ending, try our Peach Pie Donuts, which offer a delightful contrast to the savory fish and chips.


Healthier Alternatives to Traditional Fish and Chips

If you’re looking to reduce calories without sacrificing flavor, here are some healthier variations.

Baking and Air Frying Options

  • Bake the Fish: Bake at 425°F for 12-15 minutes, turning halfway.
  • Air Frying Chips: Air fry the chips for a crispy texture with minimal oil.

Substituting Ingredients

  • Whole Wheat Flour: Substitute regular flour with whole wheat flour for added fiber.
  • Alternative Oils: Use avocado oil for its healthy fats and high smoke point.

For a nutritious, protein-packed twist, try pairing your fish with our Flourless Peanut Butter Banana Muffin for a balanced meal.


Frequently Asked Questions (FAQs)

These are some common questions about beer battered fish and chips with practical tips.

Why is beer batter preferred over regular batter?

Beer’s carbonation creates a light, crispy texture that’s hard to achieve with regular batter.

Can I make beer batter without alcohol?

Yes, substitute beer with club soda or sparkling water for similar results.

How do I keep fried fish crispy?

Serve immediately after frying, and avoid covering to prevent trapping steam.

Can other types of fish be used for beer battered fish?

Yes, white fish varieties like cod, haddock, and tilapia work well.

Is beer battered fish gluten-free?

Traditional beer batter is not gluten-free, but using gluten-free flour and beer substitutes can make it suitable.

How do I reheat beer battered fish?

Reheat in the oven at 350°F for 10-12 minutes to maintain crispiness.


Conclusion

Beer Battered Fish and Chips is an iconic dish that brings together golden, crispy batter and flaky white fish. With the right ingredients, frying techniques, and side accompaniments, you can recreate this classic pub favorite at home. Pair with traditional sides and a refreshing drink for an authentic fish and chips experience. Try some of our other seafood-inspired dishes, like Creamy Clam Chowder, for a hearty meal to complete your culinary adventure.

Posted on Leave a comment


Brown Butter Lobster Rolls Recipe

Brown Butter Lobster Rolls take the classic lobster roll to a new level, adding the rich, nutty flavor of browned butter to elevate every bite. Perfectly cooked lobster, toasted buns, and a unique butter preparation make this dish both indulgent and satisfying. With roots in New England cuisine, lobster rolls have gained national popularity, and this brown butter variation offers an exciting twist for seafood lovers.


Introduction to Brown Butter Lobster Rolls

Lobster rolls are beloved in New England, known for their simplicity and exquisite flavor. Typically, lobster rolls are served with a light touch of melted butter or a hint of mayonnaise. In this variation, browning the butter adds depth, a nutty richness that complements the sweetness of fresh lobster meat. This approach provides a gourmet experience without complicated techniques, perfect for both casual and special meals.

If you enjoy seafood-based dishes with unique flavors, you may want to try our Healthy Baked Chili Lime Salmon recipe, which brings a zesty, spicy twist to baked salmon. This is another excellent option for a quick, flavorful seafood meal.


Ingredients for Brown Butter Lobster Rolls

Each ingredient in this recipe enhances the dish’s flavor and texture, providing a balanced bite in every roll.

Primary Ingredients

  • Fresh Lobster Meat: Choose steamed or boiled lobster meat for the best texture and sweetness. Using pre-cooked or frozen lobster is also an option but requires gentle reheating.
  • Butter for Browning: Opt for high-quality, unsalted butter to ensure the right balance and flavor.
  • Split-Top Buns: Soft and easy to toast, split-top buns are perfect for lobster rolls, providing the ideal structure for holding the lobster filling.

Flavor Enhancers

  • Lemon: Fresh lemon juice brightens up the flavors and adds a touch of acidity.
  • Chives or Scallions: These herbs bring mild, aromatic undertones, enhancing the overall flavor profile.
  • Salt and Pepper: Simple seasonings that amplify the natural taste of lobster.

Optional Ingredients

  • Garlic: Adding a hint of garlic to the brown butter can bring an extra layer of depth.
  • Tarragon or Dill: These herbs introduce a fresh, earthy aroma.
  • Mayonnaise: For a creamier texture, you can add a small amount of mayonnaise to the butter mixture.

If you’re a fan of bold flavors, you might also enjoy our Cajun Garlic Butter Steak Bites, which showcases another take on garlic butter with a Cajun kick.


How to Make Brown Butter for Lobster Rolls

Brown butter is a simple but flavorful twist that makes this recipe stand out. Here’s how to make it just right.

Step-by-Step Process

  1. Melt the Butter: In a small saucepan, melt butter over medium heat. Let it bubble and foam.
  2. Watch Closely: Stir frequently and watch the color; the butter will turn golden brown and develop a nutty aroma.
  3. Remove from Heat: As soon as you see amber color and smell the nutty aroma, remove it from heat to prevent burning.

For tips on perfecting the brown butter process, check out Bon Appetit for additional insights.

Pro Tips

  • Monitor the Temperature: Medium heat is ideal for browning butter evenly without burning it.
  • Store Leftover Brown Butter: Any extra brown butter can be stored in the fridge and used in future recipes.

Preparing the Lobster Meat

Freshly cooked lobster is best for this recipe, but pre-cooked lobster works too. Here’s how to prepare it for perfect texture and flavor.

Cooking Fresh Lobster

  • Steaming: Steam lobsters for 8-10 minutes per pound to retain the sweet flavor and tender texture.
  • Boiling: Boil lobsters for 7-8 minutes per pound. Salt the water generously for enhanced flavor.

Preparing Pre-Cooked or Frozen Lobster

  • Thawing: For frozen lobster meat, thaw it in the refrigerator overnight to prevent texture loss.
  • Reheating: Gently reheat lobster meat by warming it in brown butter just before assembling the rolls.

Removing the Meat

  • Extracting Claw, Knuckle, and Tail Meat: Use a cracker to carefully remove the meat, preserving whole pieces for better texture.
  • Pat Dry: Pat the lobster meat with a paper towel to remove excess moisture before adding it to the rolls.

For tips on preparing other hearty seafood meals, try our Creamy Clam Chowder, which brings another New England classic to your table.


Assembling the Brown Butter Lobster Rolls

Assembling the lobster rolls is quick and easy once your lobster and brown butter are ready.

Preparing the Buns

  • Toast the Buns: Brush the sides of each bun with butter and toast on a skillet or grill until golden brown.
  • Toasting Tips: This step ensures a slight crunch and prevents the buns from becoming soggy.

Combining Lobster with Brown Butter

  • Toss with Brown Butter: In a mixing bowl, coat the lobster meat with brown butter, tossing gently to ensure even distribution.
  • Add Lemon and Seasoning: For added flavor, squeeze fresh lemon juice over the lobster and season with salt and pepper to taste.

Layering and Garnishing

  • Assemble the Rolls: Fill each bun generously with lobster meat.
  • Garnish: Sprinkle chopped chives or scallions on top for extra color and flavor.

Variations of Brown Butter Lobster Rolls

Experimenting with different flavors allows you to customize this classic dish.

Classic Maine Style vs. Connecticut Style

  • Maine Style: Traditionally served cold with mayonnaise. For this recipe, mix a bit of brown butter with mayo for a fusion style.
  • Connecticut Style: Served warm with butter. Brown butter adds an extra layer of richness to this style.

Spicy Lobster Roll

  • Add Spice: Chili flakes, sriracha, or jalapeño slices can be added to the brown butter mixture for heat.

Herbed Butter Lobster Roll

  • Use Fresh Herbs: Fresh tarragon, dill, or parsley mixed with brown butter can bring a unique, aromatic flavor.

If you enjoy bold, herbed flavors, consider trying our Caprese Stuffed Portobello Mushrooms for a different take on using fresh herbs.


Serving Suggestions and Pairings

Choosing the right sides and beverages enhances the overall dining experience.

Traditional Sides

  • Coleslaw: A creamy coleslaw provides a cool, refreshing contrast.
  • Fries or Chips: These crunchy sides add a satisfying texture.

Fresh, Light Sides

  • Arugula Salad: A simple salad with a light vinaigrette balances the richness of the lobster roll.
  • Corn on the Cob: Grilled or steamed, corn is a classic New England side.

Beverage Pairings

  • White Wine: Light, crisp wines like Sauvignon Blanc or Pinot Grigio complement the lobster’s flavor.
  • Sparkling Water or Lemonade: Non-alcoholic options like sparkling water with lemon offer a refreshing finish.

For a refreshing dessert pairing, try our Peach Pie Donuts to complete your meal with a sweet twist.


How to Store and Reheat Lobster Rolls

Proper storage keeps your lobster rolls tasting fresh.

Refrigeration

  • Store Lobster Separately: Store lobster meat and buns separately in airtight containers for up to 2 days.
  • Avoid Assembling Early: Assemble the rolls just before serving to keep buns from getting soggy.

Reheating Tips

  • Warm Gently: Gently warm the lobster meat in brown butter over low heat.
  • Re-toast Buns: Re-toast the buns if they were stored in the refrigerator to restore their crispness.

For a quick, protein-rich snack alongside your leftovers, try our Flourless Peanut Butter Banana Muffin, which complements savory seafood flavors with a hint of natural sweetness.


Frequently Asked Questions (FAQs)

Here are common questions about making and serving brown butter lobster rolls.

What’s the best type of butter for browning?

Unsalted butter is best as it allows for better control over seasoning.

Can I use frozen lobster?

Yes, just ensure it’s fully thawed and warmed gently before use.

How do I keep buns from getting soggy?

Toast the buns right before filling and avoid excess liquid seasoning.

Can lobster rolls be made ahead?

It’s best to assemble them right before serving, though you can prep ingredients ahead.

How long will brown butter lobster rolls stay fresh?

With proper storage, the lobster meat stays fresh for up to 2 days.


Conclusion

Brown Butter Lobster Rolls offer a rich, flavorful twist

Posted on Leave a comment


H2-Healthy Baked Chili Lime Salmon

is a simple yet flavorful dish that combines the tanginess of lime with a hint of spice from chili powder, bringing out the best in salmon’s naturally rich taste. This recipe is ideal for a quick, nutritious dinner or meal prep, offering a balance of protein, healthy fats, and bold flavors. With just a few ingredients, you can create a wholesome dish that’s perfect for weeknights or as part of a larger meal spread.

Introduction to Healthy Baked Chili Lime Salmon

This Healthy Baked Chili Lime Salmon recipe is a quick and delicious way to enjoy a nutritious meal packed with protein and flavor. Combining the zesty brightness of lime and a mild chili spice, this baked salmon dish is perfect for anyone looking to add a flavorful twist to their dinner routine. Salmon is known for its health benefits, including omega-3 fatty acids, which make it an excellent choice for heart health and overall wellness. For a deeper look into the benefits of seafood nutrition, check out Seafood Nutrition Partnership.

If you’re interested in ways to balance your meals with flavorful, healthful dishes, take a look at this guide on easy meal prep ideas from Eat Right. These tips pair well with quick recipes like this salmon dish.


Ingredients for Healthy Baked Chili Lime Salmon

Gathering fresh, quality ingredients is essential for a dish that’s as nutritious as it is flavorful.

Primary Ingredients

  • Salmon Fillets: Choose wild-caught salmon for its richer flavor and nutrient profile. Skin-on fillets help retain moisture during baking.
  • Chili Powder and Lime Juice: These two ingredients are the stars, creating a balance of heat and tang. Freshly squeezed lime juice is essential for brightness.
  • Garlic and Olive Oil: Garlic adds depth to the flavor, while olive oil keeps the salmon moist.
  • Optional Sweetener: A touch of honey or maple syrup can balance the spice for a subtly sweet undertone.

Additional Seasoning Options

  • Cumin and Smoked Paprika: These spices add a smoky warmth, enhancing the chili’s depth.
  • Salt and Pepper: Basic seasoning that highlights the natural flavors of the salmon.

Suggested Sides and Garnishes

  • Avocado Salsa: Creamy avocado contrasts beautifully with the chili-lime flavors.
  • Roasted Vegetables: Asparagus, bell peppers, or broccoli make healthy, colorful sides.
  • Fresh Herbs: Chopped cilantro or parsley adds a pop of color and a refreshing finish. If you’re looking to experiment, our recipe for stuffed mushroom dip features complementary flavors that pair well with seafood.

Step-by-Step Preparation and Cooking Process

These simple steps will help you achieve a perfectly baked, flavorful salmon.

Preparing the Marinade

  • Combine Ingredients: In a small bowl, mix chili powder, lime juice, minced garlic, olive oil, and a touch of honey or maple syrup if desired.
  • Marinating Tips: Coat the salmon fillets with the marinade and let sit for 15-20 minutes. This short marination allows the flavors to penetrate without overwhelming the fish.

Baking Techniques

  • Preheat the Oven: Heat your oven to 400°F (200°C). Line a baking sheet with parchment paper or foil for easy cleanup.
  • Bake the Salmon: Place the marinated salmon on the baking sheet, skin-side down, and bake for 12-15 minutes or until the fish flakes easily with a fork.
  • Checking for Doneness: Aim for an internal temperature of 145°F to ensure the salmon is perfectly cooked but still moist.

Alternative Cooking Methods

  • Grilling: For a smoky flavor, grill the salmon over medium-high heat for 4-5 minutes per side.
  • Broiling: Finish with a 2-3 minute broil for a crispy top.

Pro Tips for Success

  • Avoid Overcooking: Salmon can become dry if overcooked, so check a few minutes early.
  • Crispy Finish: A brief broil at the end can give the salmon a nice, crispy edge.

H3-Health Benefits of Salmon and Seasoning Choices

Salmon is one of the healthiest fish you can include in your diet, and the chili-lime seasoning adds both flavor and additional health benefits.

Nutritional Profile of Salmon

  • High in Omega-3 Fatty Acids: Omega-3s are beneficial for heart health and inflammation reduction.
  • Protein-Rich: Each serving of salmon provides high-quality protein essential for muscle growth and repair.
  • Vitamin and Mineral Boost: Salmon contains vitamins D and B12, as well as selenium, which has antioxidant properties.

Benefits of Chili and Lime

  • Chili Powder: Contains capsaicin, known for its antioxidant and anti-inflammatory properties.
  • Lime Juice: High in vitamin C, which supports immune health and adds a tangy brightness that balances the richness of the salmon.

For a low-sodium alternative, opt for a dash of sea salt or try this dish alongside our popular creamy clam chowder for a balanced meal with contrasting textures.


Recommended Side Dishes for Chili Lime Salmon

Pairing the salmon with the right sides enhances the meal, creating a complete, nutritious experience.

Classic Pairings

  • Rice or Quinoa: These grains soak up the chili-lime juices, adding a mild base.
  • Roasted Potatoes: Lightly seasoned baby potatoes make an ideal side.

Fresh, Healthy Sides

  • Avocado Salsa: Dice avocado, red onion, and tomato, and season with lime juice and cilantro.
  • Roasted Asparagus or Green Beans: These veggies pair well with salmon’s richness.

Quick and Easy Options

  • Steam-in-Bag Vegetables: Perfect for a quick, no-fuss side.
  • Mixed Green Salad: A fresh salad with a light vinaigrette adds crunch.

Consider trying this with our easy baked sweet potato for an easy-to-make, nutrient-dense pairing.


How to Store and Reheat Baked Salmon

Proper storage and reheating techniques help retain the flavor and texture of baked salmon.

Storing Leftovers

  • Refrigerate: Place leftover salmon in an airtight container and store in the fridge for up to 3 days.
  • Freezing Tips: Wrap tightly in foil, then place in a freezer-safe bag for up to 2 months.

Reheating Tips

  • Oven Method: Reheat at a low temperature, around 275°F, for 10-15 minutes.
  • Stovetop Method: Heat in a covered skillet with a splash of water or olive oil.

For a protein-packed snack idea, our flourless peanut butter banana muffin pairs well with leftover salmon, providing a satisfying balance of flavors.


Frequently Asked Questions (FAQs)

Below are answers to common questions about preparing and serving chili-lime salmon.

What temperature should salmon be baked at?

Bake salmon at 400°F (200°C) for tender, flaky texture.

Can I use frozen salmon?

Yes, but thaw it in the fridge overnight for even cooking.

Is chili-lime salmon keto-friendly?

Yes! This recipe is low in carbs and fits well with keto and low-carb diets.

How do I know if the salmon is done?

Salmon is done when it flakes easily with a fork and reaches an internal temperature of 145°F.

Can I marinate salmon overnight?

Marinating salmon for 20-30 minutes is ideal; longer can affect its texture.

How do I make salmon less spicy?

For a milder flavor, reduce the chili powder or add a small amount of honey for sweetness.


Conclusion

Healthy Baked Chili Lime Salmon is a vibrant, nutrient-packed meal that’s both easy to make and satisfying. With a flavorful marinade and simple sides, this dish is perfect for weeknights or meal prep. For more delicious seafood recipes, consider exploring creamy chicken casserole for a hearty, comforting option to serve alongside this light and zesty salmon.

Posted on Leave a comment

Cilantro-Lime Shrimp Tacos Recipe

Cilantro-Lime Shrimp Tacos bring a fresh, zesty twist to traditional taco recipes, combining the tang of lime with the herbal kick of cilantro. Perfect for a quick and healthy dinner, these tacos are light yet satisfying, making them a favorite choice for taco night or any casual gathering.


Introduction to Cilantro-Lime Shrimp Tacos

Cilantro-lime shrimp tacos are a Mexican-inspired dish that has gained popularity for its vibrant flavors and ease of preparation. The combination of lime and cilantro is iconic in Mexican cuisine, adding freshness and a touch of acidity that complements seafood beautifully. With just a few ingredients and minimal prep time, these tacos offer a deliciously balanced meal that’s both filling and refreshing.

For those exploring more creamy seafood recipes, check out our Easy Creamy Crab Salad, which makes an excellent appetizer to serve alongside these tacos.


Ingredients for Cilantro-Lime Shrimp Tacos

Gathering fresh, quality ingredients is key to making these tacos delicious and flavorful. Here’s a breakdown of each essential component.

Shrimp Selection

  • Fresh or Frozen Shrimp: Choose wild-caught shrimp for a robust flavor, if available. Medium or large shrimp work best for tacos, as they hold their texture and fit nicely in tortillas.
  • Tips for Preparing Shrimp: If using frozen shrimp, defrost completely and pat dry to ensure the marinade sticks.

Cilantro-Lime Marinade

  • Lime Juice: Freshly squeezed lime juice brings a tangy zest.
  • Cilantro: Chopped fresh cilantro adds a vibrant green color and aromatic notes.
  • Garlic and Olive Oil: These ingredients add a subtle richness and help coat the shrimp in flavor.
  • Spices: Ground cumin, chili powder, and smoked paprika create warmth and depth.

Toppings and Garnishes

  • Corn or Flour Tortillas: Corn tortillas add authenticity, while flour tortillas offer a soft, neutral base.
  • Additional Toppings: Shredded cabbage, avocado slices, queso fresco, and radishes add flavor and texture.
  • Optional Ingredients: Add mango salsa, pickled onions, or jalapeños for an extra layer of flavor.

For a full Mexican-inspired meal, try pairing these tacos with our popular Easy Baked Sweet Potato recipe, which complements the zesty shrimp perfectly.


How to Marinate and Cook Shrimp for Tacos

Marinating and cooking the shrimp correctly ensures they’re packed with flavor and maintain a tender texture.

Creating the Cilantro-Lime Marinade

  • Mix Ingredients: In a medium bowl, combine lime juice, olive oil, chopped cilantro, minced garlic, cumin, chili powder, and smoked paprika. Whisk until smooth.
  • Marinating Tips: Toss the shrimp in the marinade, coating them evenly. Marinate for 15-20 minutes—no longer, as the acid in lime can make the shrimp mushy.

Cooking Techniques

  • Stovetop: Heat a non-stick skillet over medium-high heat and cook the shrimp for 2-3 minutes per side until pink and opaque.
  • Grilling: Preheat the grill to medium-high, thread the shrimp on skewers, and cook for 2 minutes per side.
  • Oven-Baked: For a hands-off method, bake shrimp at 400°F for 5-7 minutes until cooked through.

For a deliciously spicy twist on shrimp tacos, consider trying our Cajun Garlic Butter Steak Bites as a side or complement to your taco night.


Cilantro-Lime Sauce Options

A good sauce enhances the taco experience, adding creaminess and balancing the bright flavors of the shrimp and lime.

Creamy Cilantro-Lime Sauce

  • Base: Start with Greek yogurt or sour cream as a creamy foundation.
  • Flavor Enhancers: Add lime zest, lime juice, chopped cilantro, and a pinch of salt.
  • Blending Tip: Use a small blender or whisk thoroughly for a smooth sauce.

Spicy Lime Crema

  • Adding Heat: Stir in sriracha, hot sauce, or chipotle powder for a spicy kick.
  • Balancing Creaminess: Use sour cream or Greek yogurt to create a balanced, creamy texture.

Dairy-Free Alternative

  • Avocado-Based Sauce: Blend avocado, lime juice, cilantro, and olive oil for a smooth, dairy-free option.
  • Coconut Milk Twist: Mix coconut milk with lime juice for a light, tropical sauce.

Assembling the Tacos

Assembling the tacos with the right layers of flavor and texture creates a perfect bite every time.

Preparing the Tortillas

  • Warming Tips: Heat tortillas on a dry skillet over medium heat for about 30 seconds per side or wrap in foil and warm in a 350°F oven for 5 minutes.
  • Softening: Stack warm tortillas in a towel to keep them soft and pliable.

Layering Toppings for Optimal Flavor

  • Start with Shrimp: Place a few shrimp in each tortilla as the base.
  • Add Sauce and Toppings: Spoon on the cilantro-lime sauce, then layer with shredded cabbage or lettuce, avocado slices, and other toppings.
  • Garnishing Tips: Top with fresh cilantro leaves, a squeeze of lime, or radish slices for extra flavor and presentation.

Side Dishes and Serving Suggestions

Pairing these tacos with complementary sides completes the meal, balancing flavors and textures.

Classic Mexican Side Dishes

  • Mexican Rice: A classic choice that complements shrimp tacos.
  • Black Beans: Rich in protein and fiber, perfect for a nutritious side.
  • Mexican Street Corn Salad: Combines sweet corn, mayonnaise, chili powder, and lime for a creamy, tangy side.

Light Salad Pairings

  • Simple Cabbage Slaw: Shredded cabbage tossed with lime juice, salt, and pepper.
  • Avocado Salad: Diced avocado, cherry tomatoes, and cucumber with a lime vinaigrette.

For a sweet yet tangy treat, try our Peach Pie Donuts as a dessert after your taco meal.

Beverage Pairings

  • Classic Margaritas: Lime margaritas are a natural fit with shrimp tacos.
  • Agua Fresca: Refreshing fruit drinks, perfect for cooling the spice.
  • Mexican Beer: A light lager or amber beer pairs well with shrimp tacos.

Health Benefits of Cilantro-Lime Shrimp Tacos

These tacos offer not only great flavor but also several nutritional benefits.

Nutritional Benefits of Shrimp

  • High Protein, Low-Calorie: Shrimp is a lean protein source, low in calories and fat.
  • Rich in Omega-3s: Omega-3s in shrimp support heart health and reduce inflammation.
  • Essential Minerals: Shrimp provide selenium, iodine, and B vitamins, which boost energy and support thyroid function.

Benefits of Cilantro and Lime

  • Cilantro: High in antioxidants and known for its digestive benefits.
  • Lime: Packed with vitamin C, essential for immune health and skin.

If you’re interested in a nutritious yet indulgent side, our Flourless Peanut Butter Banana Muffins make an ideal treat.


Frequently Asked Questions (FAQs)

Below are common questions about making and serving cilantro-lime shrimp tacos.

Can I use frozen shrimp?

Yes, frozen shrimp works well. Just ensure they are fully thawed and patted dry before marinating.

How long should shrimp be marinated?

Shrimp should marinate for no more than 15-20 minutes to avoid an overly soft texture.

Can I make the cilantro-lime sauce ahead of time?

Yes, the sauce can be made 1-2 days in advance. Store in an airtight container in the fridge.

How do I make shrimp tacos less spicy?

Omit chili powder and reduce any spicy sauce for a milder version.

What toppings work best with shrimp tacos?

Avocado, shredded cabbage, pickled onions, and mango salsa all complement these tacos well.

Are shrimp tacos keto-friendly?

They can be if served in lettuce wraps or low-carb tortillas.


Conclusion

Cilantro-lime shrimp tacos bring the perfect blend of fresh, tangy, and savory flavors to the table. Whether you’re preparing them for a weeknight dinner or serving guests at a taco night, these tacos are sure to impress. With simple ingredients, a flavorful marinade, and a variety of toppings and sauces to choose from, they’re a versatile dish everyone will love.

For more seafood-inspired recipes, explore our site, including the popular Creamy Clam Chowder for another comforting and flavorful dish.


Posted on Leave a comment

Creamy Clam Chowder Recipe

Creamy Clam Chowder is a quintessential comfort dish known for its rich flavor and warming texture. This popular recipe is especially loved in New England, where it’s cherished as both a restaurant staple and a homemade delight. With tender clams, hearty potatoes, and smoky bacon in a creamy broth, this clam chowder is a perfect choice for any seafood lover.


Introduction to Creamy Clam Chowder

Clam chowder dates back centuries, particularly in coastal New England, where the chilly climate called for warming, hearty meals. The cream-based, New England-style chowder is famous for its thick texture and briny flavors, distinguishing it from the tomato-based Manhattan clam chowder. For an overview of essential seafood cooking tips, check out this step-by-step guide on making cilantro lime shrimp tacos on iryrecipes.com, which covers similar cooking methods to enhance your seafood recipes.

New England clam chowder combines creaminess with the tender, slightly briny taste of clams, creating a flavor profile that’s both savory and rich. If you’re interested in learning about other creamy dishes, the Easy Creamy Crab Salad recipe is another delightful seafood-based option.


Key Ingredients for Creamy Clam Chowder

Creating a rich, flavorful clam chowder at home requires a few key ingredients that bring out the unique, savory flavor of the dish.

Primary Ingredients

  • Clams: Fresh clams are ideal for a richer flavor, but canned clams are a convenient, tasty option as well.
  • Potatoes: Yukon Gold or russet potatoes are traditional for chowder, adding a starchy thickness to the soup.
  • Cream or Milk: Heavy cream or whole milk serves as the primary source of creaminess, though they can be adjusted for a lighter version.
  • Bacon: Adds a smoky depth that complements the clams’ natural sweetness.

Flavor Enhancers

  • Onions and Celery: Essential aromatics that add complexity.
  • Butter: Used for sautéing, enhancing the base richness.
  • Thyme and Bay Leaves: Popular herbs that subtly infuse the broth with an earthy aroma.

Optional Ingredients

  • Carrots: For added color and a hint of sweetness.
  • Parsley: Often used as a garnish, adding a fresh touch.

STEP -by-Step Cooking Process

Making creamy clam chowder is a straightforward process with these detailed steps:

 Prepare the Clams

  • Fresh Clams: Scrub clean and steam until they open, then chop the meat. Reserve the clam juice for added flavor.
  • Canned Clams: Drain and reserve the liquid for the broth.

Cook the Bacon and Aromatics

  • Render bacon in a large pot until crispy. Remove and set aside, leaving the drippings in the pot.
  • Sauté chopped onion and celery in the bacon drippings until softened, adding depth to the flavor.

Build the Chowder Base

  • Add Potatoes: Stir in diced potatoes and cook briefly.
  • Pour in Clam Juice and Broth: Add the reserved clam juice, chicken broth, and bay leaves, simmering until potatoes are tender.

Incorporate Cream and Clams

  • Stir in heavy cream or milk for a smooth base. Add the clams and reserved bacon pieces, seasoning with salt, pepper, and thyme as desired.

Flavor Profile & Texture of Creamy Clam Chowder

Clam chowder’s appeal lies in its balance of creamy, savory, and slightly briny flavors.

  • Cream and Broth Balance: Adjust the cream-to-broth ratio for desired thickness.
  • Enhancing Smokiness: Use smoked bacon or a pinch of smoked paprika.
  • Brightening with Herbs: Fresh thyme or parsley adds a light, herbal note that brightens the dish.

Health Benefits and Nutritional Information

Aside from its comfort appeal, clam chowder offers several nutritional benefits:

  • High in Protein: Clams are an excellent source of lean protein, beneficial for muscle repair and growth.
  • Omega-3 Fatty Acids: Clams contain omega-3s, which support heart health and cognitive function.
  • Essential Minerals: Clams are rich in iron, zinc, and vitamin B12, all essential for a healthy diet.

For a balanced approach to creamy, seafood-based meals, try the Creamy Chicken Casserole for a non-seafood alternative.


Variations of Clam Chowder

There are many ways to personalize clam chowder, from regional versions to ingredient adjustments.

Classic New England vs. Manhattan Chowder

  • New England: Cream-based and thick with potatoes.
  • Manhattan: Tomato-based, without cream, for a lighter, acidic twist.

Spicy Clam Chowder

  • Add chili flakes, jalapeños, or smoked paprika to bring heat to the dish.

Vegetarian & Vegan Clam Chowder

  • Substitute clams with mushrooms for a similar texture and use coconut milk or almond milk as a dairy-free base.

Seafood Chowder

  • Add shrimp, scallops, or white fish for a broader seafood chowder experience.

Serving Suggestions and Garnishes

To enhance the clam chowder experience, pair it with complementary sides or garnishes.

Traditional Serving Options

  • In a Bread Bowl: Hollowed-out sourdough bowls are a favorite.
  • Oyster Crackers: Adds a classic crunch.

Garnishing Tips

  • Bacon Crumbles: Adds extra smokiness.
  • Parsley or Chives: Brightens the presentation and adds freshness.
  • Cream Drizzle: A small swirl of cream elevates the presentation.

Perfect Pairings


Storage and Reheating Tips

Proper storage and reheating ensure clam chowder remains flavorful:

Refrigeration

  • Store in an airtight container in the fridge for up to 3 days.

Freezing

  • Freeze in individual portions for convenience, though note that dairy-based soups may change texture when thawed.

Reheating

  • Reheat gently over low heat, stirring occasionally, to maintain a creamy consistency.

Frequently Asked Questions (FAQs)

Here are common questions about making and serving clam chowder.

How can I make clam chowder thicker?

To thicken chowder, you can add cornstarch or mash some of the potatoes.

Can I substitute fresh clams for canned clams?

Yes, fresh clams provide a more intense flavor, though canned clams are convenient and still delicious.

Is clam chowder gluten-free?

Traditional chowder can be made gluten-free by using cornstarch instead of flour for thickening.

How do I make clam chowder less heavy?

Use milk instead of heavy cream and reduce bacon for a lighter version.

Can clam chowder be frozen?

Yes, but freezing may alter the creamy texture. Thaw and reheat slowly for the best results.


Conclusion

Creamy clam chowder combines the savory taste of clams with a rich, smooth broth for a satisfying meal that’s easy to prepare at home. Whether you prefer a thick, New England-style chowder or a light, tomato-based Manhattan version, this chowder is versatile and customizable to your taste. Serve it in a bread bowl, add a dash of spice, or explore various garnishes to make it uniquely yours!


The internal links provide useful, related recipes and cooking tips from iryrecipes.com for readers interested in further exploring creamy, comforting dishes. This approach encourages engagement across related content on the website.

Posted on Leave a comment

Easy Creamy Crab Salad Recipe

Easy Creamy Crab Salad Recipe

Easy Creamy Crab Salad is a go-to for a fresh, flavorful, and versatile dish that works as a quick meal, appetizer, or side. This guide will walk you through creating a delicious, balanced crab salad and suggest variations and serving ideas. With added tips for enhancing texture and flavor, this creamy crab salad can quickly become a staple in your recipe rotation.

Ingredients for Easy Creamy Crab Salad

The foundation of any great crab salad is fresh, high-quality ingredients. Let’s start by breaking down the essential components and optional additions that make this salad truly customizable.

Primary Ingredients

  • Crab meat: Both real and imitation crab are excellent choices, each providing a unique texture and flavor.
  • Mayonnaise: The main source of creaminess in this salad. Low-fat versions work well for a lighter option.
  • Fresh herbs: Dill, parsley, and green onions for a refreshing, bright flavor.

Flavor Enhancers

  • Lemon juice or zest: Adds a subtle acidity, enhancing the overall taste.
  • Celery: Offers a crisp, crunchy contrast to the creamy crab.
  • Red or green onions: Bring a mild sharpness to the dish and add visual appeal.

Optional Ingredients

  • Sweet corn: Adds a slight sweetness that complements the crab.
  • Bell peppers or cucumbers: Great for a refreshing crunch.

If you’re looking to try another creamy, easy recipe, check out the Super Easy Creamy Tomato Pasta for a delicious pasta option.


Step-by-Step Instructions

Making an easy creamy crab salad at home is simple with these clear steps.

  1. Prepare Ingredients: Start by chopping crab meat into bite-sized pieces if needed. Dice celery, onions, and any optional vegetables.
  2. Combine the Salad Base: In a large bowl, mix mayonnaise and lemon juice until smooth.
  3. Fold in Crab Meat: Add crab meat gently, ensuring it’s evenly coated without breaking it up too much.
  4. Season and Chill: Add salt and pepper to taste. Cover and chill for 30 minutes before serving for best flavor.

Flavor Profile & Enhancements

Easy creamy crab salad combines creamy, tangy, and mildly sweet flavors. Here are a few ways to bring out the best in each flavor component.

  • Boost Creaminess: Add a spoonful of Greek yogurt for a creamier texture.
  • Enhance with Spice: Try a dash of paprika or hot sauce for added depth.
  • Balance with Acidity: Lemon or a splash of vinegar balances the richness.

For inspiration on using spices in other recipes, you might also enjoy reading about Cajun Garlic Butter Steak Bites.


Health Benefits of Crab Salad

Crab salad isn’t just delicious; it also offers several health benefits:

  • High Protein: Crab meat is a fantastic source of lean protein.
  • Rich in Omega-3s: Crab is known for its omega-3 fatty acids, essential for heart health.
  • Low Calorie & Low Carb: Ideal for those following keto or low-carb diets.

For a healthy treat with a creamy texture, consider trying Flourless Pumpkin Muffins as a wholesome dessert option.


Creative Variations of Crab Salad

Classic vs. Modern Versions

  • Classic: A straightforward mix with mayo, celery, and lemon.
  • Modern: Add avocado, mango, or cucumber for a refreshing twist.

Spicy Crab Salad

  • Add chili flakes or a dash of hot sauce for a spicy version.

Mediterranean-Inspired

  • Try olives, feta, and tomatoes to give the crab salad a Mediterranean flair.

Serving Suggestions and Pairings

Crab salad is versatile and can be served in multiple ways.

  • On Lettuce Wraps: Use crisp lettuce leaves for a low-carb option.
  • On Toast: Spread over toast for a simple open-faced sandwich.
  • Stuffed Avocados: Scoop crab salad into avocado halves for a beautiful presentation.

If you’re looking for other fresh and unique appetizer ideas, Stuffed Mushroom Dip could be a great addition to your recipe collection.


Storage and Make-Ahead Tips

To keep crab salad fresh, store it in an airtight container in the fridge. It will last up to three days but is best enjoyed within the first 24 hours.

Key Storage Tips:

  • Refrigerate Promptly: Chill for at least 30 minutes before serving to enhance flavor.
  • Avoid Freezing: Freezing crab salad can ruin its creamy texture.

Frequently Asked Questions (FAQs)

What’s the best type of crab for crab salad?

Real crab offers a premium flavor, but imitation crab is a great budget-friendly alternative.

Can I use a lighter substitute for mayonnaise?

Yes, Greek yogurt or low-fat mayo can make this salad lighter without sacrificing creaminess.

How long can crab salad stay fresh?

It’s best enjoyed within 1-2 days but can last up to 3 days if stored properly.


Conclusion

This easy creamy crab salad recipe combines fresh, high-quality ingredients for a flavorful, versatile dish that can be served in many creative ways. With added tips for achieving the perfect creamy texture and exploring different flavor variations, it’s an adaptable recipe suited to any occasion. Try experimenting with different flavors, and enjoy the refreshing taste of homemade crab salad!