
The Creamy Flatbread Phenomenon: Your Ultimate Guide to Creating Irresistible Flatbreads
Imagine this: a piece of warm, yielding flatbread, perhaps slightly charred from the grill or puffed perfectly in a hot pan, providing the perfect base. Now, picture it generously slathered with a cool, luscious, creamy topping – maybe tangy whipped feta, smooth ricotta, herby yogurt, or rich hummus. This delightful contrast of temperature, texture, and flavour is the heart and soul of what we’re calling “The Creamy Flatbread.” It’s more than just a recipe; it’s a concept, a versatile canvas for culinary creativity that has taken kitchens and social feeds by storm.
“The Creamy Flatbread” isn’t necessarily about a single, defined dish but rather the glorious pairing of two distinct elements: a satisfying flatbread base and a topping defined by its unmistakable creaminess. It taps into our love for textural interplay and customizable food. Why the craze? It’s partly thanks to viral trends like whipped feta, the rise of elegant grazing boards where such flatbreads shine, and our collective appreciation for dishes that feel both comforting and a little sophisticated. Moreover, the type of flatbread dough itself can be tailored, influencing the final texture, which is where understanding different types of flour [Link 1] and their properties becomes incredibly useful for achieving your desired chewiness or tenderness.
Why You’ll Fall in Love with Making Creamy Flatbread
Get ready to embrace this delightful creation. Here’s why making “The Creamy Flatbread” at home is such a rewarding experience:
Surprisingly Easy: Many people are intimidated by bread-making, but basic flatbreads, especially no-yeast versions using yogurt or baking powder, are incredibly forgiving and quick. Even simple yeasted doughs are often less demanding than traditional loaves. This makes it an easy creamy flatbread recipe accessible to everyone.
Texture Heaven: It’s all about the contrast! The potential chewiness, softness, or slight crispness of the warm flatbread paired with the smooth, cool richness of the creamy topping creates a truly satisfying mouthfeel that’s hard to beat.
Endlessly Customizable: This is where the real fun begins. You control everything:
The type of flatbread (thick, thin, chewy, crisp).
The flavour of the dough (plain, herbed, spiced).
The creamy base (cheese, yogurt, hummus, etc.).
The seasonings and final garnishes (herbs, spices, nuts, drizzles). Tailor it perfectly to your cravings or available ingredients.
Perfect for Sharing (Or Not!): “The Creamy Flatbread” is a social food. Cut into wedges, it makes a fantastic flatbread appetizer or party snack. Served whole or halved, it’s a satisfying light lunch or component of a simple dinner. It’s a star on creative grazing board ideas [Simulated Link URL].
Pantry-Friendly Potential: Many simple flatbread doughs (like a basic flour-water-salt or yogurt dough) and creamy toppings (like seasoned yogurt or basic hummus) can be made primarily from pantry staples, making it an accessible option anytime.
Deconstructing the Dream: Understanding the Core Components
To master “The Creamy Flatbread,” let’s break down its two essential parts: the foundation and the crown.
A. The Flatbread Foundation: The Canvas
The flatbread is more than just a vehicle; it’s an active participant in the flavour and texture experience.
Role: It provides the structure to hold the topping, offers a textural counterpoint (chewiness, crispness, softness), and contributes its own subtle flavour.
Types Overview: Flatbreads come in countless global variations. Common styles used as a base for creamy toppings include:
Simple Pan-Fried/Skillet Breads: Often quick, no-yeast versions made with flour, water/yogurt, leavening (optional), and salt. Cooked quickly in a hot pan.
Pita-like Breads: Yeasted or quick versions that puff up, creating a pocket (though often served open for this application). You might find inspiration in a homemade pita bread recipe [Simulated Link URL].
Naan-like Breads: Typically enriched with yogurt or milk, often yeasted, soft and chewy, traditionally cooked in a tandoor but adaptable for skillets or ovens. A simple naan recipe [Simulated Link URL] could be a great starting point.
Pizza-Style Crusts: Thinner, often yeasted dough baked at high heat, providing a crispier base.
Key Dough Ingredients & Their Function:
Flour: Provides structure. All-purpose is versatile. Bread flour gives more chew. Whole wheat adds nutty flavour and density. The choice impacts texture significantly, so understanding different types of flour [Link 1] is key.
Liquid: Hydrates the flour, developing gluten. Water, milk, or yogurt are common. Yogurt also adds tenderness and tang.
Leavening: Creates lift and airiness. Yeast (active dry or instant) provides complex flavour and chew through fermentation. Baking powder offers a quick chemical lift for no-yeast versions. Some simple flatbreads use no leavening, resulting in a denser, chewier texture.
Fat: Adds tenderness, flavour, and aids browning. Olive oil, melted butter, or even yogurt (which contains fat) are common.
Salt: Crucial for flavour enhancement and controlling yeast activity (in yeasted doughs).
B. The “Creamy” Crown: The Star Topping
This is where the “creamy” in “The Creamy Flatbread” comes to life. It provides moisture, richness, and the dominant flavour profile.
Role: Delivers the signature creamy texture, moisture contrast to the bread, primary flavour direction, and visual appeal.
Categories of Creaminess:
Cheese-Based: This is a hugely popular category.
Whipped Feta: Tangy, salty feta blended until smooth, often with cream cheese, yogurt, or olive oil. A potential standalone whipped feta dip recipe [Simulated Link URL] might offer more variations.
Ricotta: Naturally creamy, can be used plain or whipped with lemon zest, herbs, or honey. Choosing quality ricotta [Link 3], ideally whole milk, makes a difference in richness.
Cream Cheese: A versatile base, easily flavoured with herbs, garlic, spices, or smoked salmon. Think about homemade herb and garlic cream cheese [Simulated Link URL].
Goat Cheese (Chèvre): Tangy and distinct, often whipped or softened, pairs well with sweet elements like figs or honey.
Mascarpone: Extremely rich and smooth, Italian cream cheese.
Fresh Mozzarella/Burrata: While not spreadable, torn pieces melt into creamy pockets, especially on baked flatbreads.
Yogurt/Dairy-Based: Offer a lighter, tangier creaminess.
Thick Greek Yogurt: Full-fat is best for richness. Excellent base for savoury seasonings like za’atar, garlic, dill, lemon. Again, choosing quality Greek yogurt [Link 3] matters.
Labneh: Strained yogurt cheese, very thick and tangy, Middle Eastern staple.
Sour Cream / Crème Fraîche: Can be used as a base, often seasoned simply.
Bean/Veggie-Based: Provide creaminess through pureeing.
Hummus: Classic chickpea dip, offers endless flavour variations (roasted garlic, red pepper, beet). Having a great recipe for smooth homemade hummus [Simulated Link URL] is always useful.
Creamy Avocado: Mashed or blended avocado, often with lime, cilantro, and onion.
White Bean Dip: Pureed cannellini beans with garlic, rosemary, lemon, and olive oil. Explore a rosemary white bean dip recipe [Simulated Link URL] for inspiration.
Baba Ghanoush: Creamy roasted eggplant dip.
Sauce-Based: Used more sparingly, often as part of a layered topping.
Creamy Pesto: Pesto blended with ricotta or cream cheese.
Creamy Tomato Sauce: Tomato sauce enriched with cream or mascarpone.
Alfredo-Style Sauce: Rich parmesan cream sauce.
Flavour Building in Creamy Toppings: Don’t just rely on the base ingredient! Elevate it with:
Seasoning: Salt (use carefully with salty cheeses like feta!), freshly ground black pepper.
Acidity: Lemon juice or zest is crucial for cutting richness and brightening flavours. A splash of vinegar works too.
Aromatics: Fresh minced garlic, roasted garlic, finely chopped shallots.
Herbs: Fresh herbs like dill, parsley, mint, cilantro, oregano, thyme, chives add freshness and complexity. Learning how to properly store fresh herbs [Simulated Link URL] keeps them vibrant longer.
Spice: Red pepper flakes for heat, smoked paprika for smokiness, cumin or za’atar for earthiness.
Essential Ingredients for a Signature Creamy Flatbread (Example: Simple Yogurt Dough + Whipped Feta)
Let’s focus on a popular and relatively easy combination to illustrate the core components:
A. For the Flatbread Dough (Example: No-Yeast Yogurt Dough)
Flour: All-purpose flour works perfectly here, providing a balance of structure and tenderness. If using self-rising flour, you can often omit the baking powder and salt (check package).
Greek Yogurt: Full-fat plain Greek yogurt is preferred. It provides moisture, fat (for tenderness), and tang, contributing significantly to the dough’s flavour and texture.
Baking Powder: The chemical leavener responsible for the quick puffiness in this no-yeast flatbread. Ensure it’s not expired for best results.
Salt: Fine sea salt or table salt enhances the overall flavour of the flatbread.
Olive Oil / Melted Butter (Optional but Recommended): For brushing the dough before cooking or adding to the pan. Adds flavour, helps prevent sticking, and promotes lovely golden-brown colour.
B. For the Creamy Topping (Example: Whipped Feta)
Feta Cheese: Use a block of feta cheese, preferably packed in brine, rather than pre-crumbled. Block feta is generally creamier, less dry, and has better flavour. Greek, French, or Bulgarian styles all work, offering slightly different flavour profiles.
Cream Cheese or Greek Yogurt: A few tablespoons of full-fat cream cheese (softened) or thick Greek yogurt helps smooth out the feta, adds extra creaminess, and mellows its intense saltiness.
Olive Oil: A good quality extra virgin olive oil adds flavour and helps create a smooth, luxurious texture when whipped.
Lemon Juice / Zest: Fresh lemon juice provides essential acidity to brighten the rich feta. Zest adds extra aromatic lemon flavour without extra liquid.
Garlic (Optional): A small clove of freshly minced garlic or a bit of roasted garlic adds a savoury depth. Use sparingly raw, as it can be potent. Roasting garlic transforms its flavor, as shown in this guide to roasting garlic easily [Simulated Link URL].
Fresh Herbs (Optional): Fresh dill is a classic pairing with feta. Mint, oregano, or parsley also work beautifully. Chop them finely.
Water (If needed): A splash (start with a teaspoon) might be needed during blending to help achieve a perfectly smooth and spreadable consistency, especially if your feta is drier.
C. For Garnish & Flavour Boost (Choose a Few)
Drizzle of Extra Virgin Olive Oil
Sprinkling of Fresh Herbs (dill, mint, parsley, oregano)
Pinch of Red Pepper Flakes for heat
Toasted Pine Nuts, Walnuts, or Pistachios for crunch
Toasted Sesame Seeds or Everything Bagel Seasoning
Drizzle of Honey (a fantastic sweet contrast to salty feta)
Sliced Kalamata Olives or Sun-Dried Tomatoes
Thinly sliced Red Onion or Cucumber
Necessary Equipment Checklist
Making “The Creamy Flatbread” doesn’t require specialized tools:
Mixing Bowls: At least one large (for dough) and one medium (for topping).
Measuring Cups & Spoons: Essential for accuracy.
Rolling Pin: For shaping the flatbread dough.
Heavy-Bottomed Skillet: Cast iron is excellent for even heat and great browning. A non-stick skillet, griddle, or grill pan also works. Alternatively, a baking sheet or pizza stone for oven baking.
Spatula / Tongs: For flipping the flatbread.
Food Processor or Hand Mixer (Optional): Very helpful for achieving ultra-smooth whipped feta or ricotta, but vigorous whisking by hand can also work.
Whisk, Rubber Spatula / Spoon: For mixing ingredients.
Step-by-Step Guide: Creating Your Signature Creamy Flatbread (Yogurt Dough + Whipped Feta Example)
Let’s walk through creating our example “Creamy Flatbread” from scratch.
A. Step 1: Prepare the Flatbread Dough (No-Yeast Yogurt Dough)
Combine Dry Ingredients: In a large bowl, whisk together 2 cups of all-purpose flour, 1 ½ teaspoons of baking powder, and ½ teaspoon of salt. Whisking ensures even distribution.
Add Wet Ingredient: Add 1 cup of full-fat plain Greek yogurt to the dry ingredients.
Mix to Form Shaggy Dough: Use a fork or your hands to mix until a shaggy, slightly sticky dough forms. All the flour should be mostly incorporated.
Knead Briefly: Turn the dough out onto a lightly floured surface. Knead gently for just 1-2 minutes, until the dough comes together and feels mostly smooth. Avoid over-kneading; this type of dough only needs minimal kneading to become cohesive. It should still be soft.
Rest (Recommended): Shape the dough into a ball, place it back in the bowl (or keep it on the counter), cover with a clean kitchen towel or plastic wrap, and let it rest for 15-20 minutes. This step relaxes the gluten, making the dough much easier to roll out thinly.
B. Step 2: Prepare the Creamy Topping (Whipped Feta)
Combine Ingredients: Crumble about 6-8 ounces of block feta cheese into the bowl of a food processor. Add 2-3 tablespoons of softened cream cheese (or thick Greek yogurt), 1-2 tablespoons of extra virgin olive oil, 1 tablespoon of fresh lemon juice, and optionally, ½ teaspoon of lemon zest and 1 small minced garlic clove.
Blend/Whip: Secure the lid and process on high speed until the mixture is very smooth and creamy, scraping down the sides of the bowl as needed. This might take 1-3 minutes depending on your processor. If the mixture seems too thick, add cold water, one teaspoon at a time, processing until it reaches a easily spreadable consistency. (Alternatively, place ingredients in a medium bowl, mash thoroughly with a fork, then whisk vigorously until as smooth as possible).
Stir in Herbs (If using): If adding fresh herbs like chopped dill or mint, add them after processing and pulse a few times or gently stir them in by hand.
Taste and Adjust: Taste the whipped feta. Depending on your feta’s saltiness, it likely won’t need extra salt. Add more lemon juice if you prefer more tang, or a pinch of black pepper. Transfer to a serving bowl and set aside (can be made ahead and refrigerated).
C. Step 3: Shape and Cook the Flatbread
Divide Dough: After resting, divide the dough into 4 or 6 equal portions (depending on desired size). Roll each portion into a ball.
Roll Out: Working with one portion at a time on a lightly floured surface, use a rolling pin to roll the dough out thinly into a round or oval shape, about ⅛ to ¼ inch thick. If the dough springs back too much, let it rest for another few minutes.
Cook (Choose your method):
Pan-Frying (Recommended for this dough): Heat a large, heavy-bottomed skillet (preferably cast iron) over medium-high heat. Once hot, add about a teaspoon of olive oil or butter (optional) or cook in a dry pan. Carefully place one rolled-out flatbread into the hot skillet. Cook for 2-4 minutes per side, until large bubbles form on the surface, the underside is golden brown and slightly charred in spots, and the dough is cooked through. Flip and cook the other side. Repeat with remaining dough, adding more oil/butter if needed. Keep cooked flatbreads warm by stacking them on a plate covered with a towel.
Grilling: Preheat your grill to medium-high heat. Lightly brush both sides of the rolled-out dough with olive oil. Place the dough directly on the hot grill grates. Grill for 1-3 minutes per side, watching closely, until grill marks appear, the dough puffs up, and it’s cooked through. Grilling basics for beginners [Simulated Link URL] can be helpful here.
Baking: Preheat your oven and a baking sheet or pizza stone to a high temperature (450°F / 230°C or higher). Carefully place the rolled-out flatbread directly onto the preheated surface. Bake for 5-8 minutes, or until puffed, golden brown, and cooked through.
D. Step 4: Assemble The Creamy Flatbread
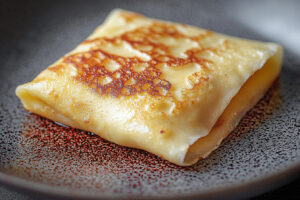
Spread the Cream: Take a warm, freshly cooked flatbread. Spread a generous layer of the prepared whipped feta evenly over the surface, leaving a small border if desired.
Add Garnishes: Immediately sprinkle with your chosen garnishes. A drizzle of extra virgin olive oil, a scattering of fresh dill or mint, a pinch of red pepper flakes, and perhaps some toasted pine nuts would be delicious with the whipped feta.
Serve Immediately: “The Creamy Flatbread” is best enjoyed right away, while the flatbread is still warm and soft, providing that delightful contrast with the cool, creamy topping. Cut into wedges for sharing if desired.
(Part 2 begins here)
Pro Tips for Creamy Flatbread Perfection
Elevate your “Creamy Flatbread” game from good to unforgettable with these essential tips:
A. Flatbread Finesse: Nailing the Base
Don’t Overwork the Dough: This is especially crucial for no-yeast doughs like the yogurt version. Over-kneading develops too much gluten, resulting in a tough, chewy flatbread instead of a tender one. Mix or knead just until the dough comes together smoothly.
Rest is Best: Even a short 15-20 minute rest for no-yeast dough (or the full rising time for yeasted dough) makes a huge difference. It allows the gluten to relax, making the dough significantly easier to roll out thinly and contributing to a more tender final product.
Consistent Thickness: Aim to roll the dough out as evenly as possible. Uneven thickness leads to uneven cooking – thin spots might burn while thicker spots remain doughy.
Hot Surface is Key: Whether pan-frying, grilling, or baking, ensure your cooking surface is properly preheated before the flatbread touches it. This promotes rapid puffing, creates desirable browning or charring, and helps cook the flatbread quickly before it dries out. Using a heavy-bottomed pan like cast iron provides excellent heat retention [Simulated Link URL].
B. Creamy Component Control: Mastering the Topping
Balancing Richness: Many creamy bases (feta, cream cheese, rich ricotta) benefit greatly from a counterpoint. Acidity is your best friend here – fresh lemon juice or zest cuts through the richness beautifully and brightens the overall flavour. Don’t underestimate its impact.
Achieving Ultra-Smoothness: For toppings like whipped feta or ricotta, a food processor is the easiest path to a silky-smooth texture. If doing it by hand, ensure your ingredients (especially cream cheese or block feta) are slightly softened (room temperature helps), mash extremely well first, then whisk vigorously. Add liquid (water, olive oil, lemon juice) very sparingly only if needed to thin it out.
Seasoning Savvy: Taste, taste, taste! Season your creamy topping after blending, especially when using inherently salty ingredients like feta or olives. Start with less salt than you think you need. Remember the flatbread itself is also seasoned. Adjust acidity and pepper levels to your preference.
C. Assembly Advice: Timing and Texture
Warm Bread, Cool Topping: The magic often lies in the temperature contrast. Assemble “The Creamy Flatbread” just before serving while the flatbread is freshly cooked and warm, and the creamy topping is cool or at room temperature.
Avoiding Sogginess: Apply the creamy topping to the cooked flatbread, not the raw dough. If using a particularly wet topping or if you need to make it slightly ahead, opt for thicker creamy bases (like labneh, well-drained whipped feta, or cream cheese spreads) which are less likely to soak into the bread quickly. Don’t let assembled flatbreads sit for extended periods.
Beyond the Basics: Creamy Flatbread Variations Galore
The example recipe is just the beginning! “The Creamy Flatbread” concept invites endless experimentation.
A. Flatbread Base Experiments: Changing the Canvas
Yeasted Dough: For a chewier texture and more complex flavour developed through fermentation, try a simple yeasted flatbread dough. This involves mixing flour, water, yeast (active dry or instant – knowing how different types of yeast work [Link 2] helps!), salt, and often a little oil or sugar, followed by kneading and rising time before shaping and cooking. It yields results closer to pita or traditional pizza crusts. Explore our guide to making easy homemade pizza dough [Simulated Link URL] which can be adapted for flatbreads.
Whole Wheat or Alternative Flours: Substitute a portion (e.g., 25-50%) of the all-purpose flour with whole wheat flour for added nutty flavour and fibre (you might need slightly more liquid). Explore other flours like spelt or buckwheat, understanding they will change the texture and handling.
Gluten-Free Flatbread Bases: Use a reliable gluten-free all-purpose flour blend (containing xanthan gum) designed for bread. Recipes often incorporate psyllium husk or other binders. Alternatively, explore recipes using almond flour, coconut flour, or tapioca starch, noting these will have distinctly different textures.
Herb/Spice Infused Dough: Knead finely chopped fresh herbs (rosemary, thyme), dried herbs, garlic powder, onion powder, or spices like cumin or paprika directly into the flatbread dough for built-in flavour.
B. Creamy Topping Universe: Exploring Flavours
Move beyond whipped feta (though it’s amazing!) and explore other creamy delights:
Ricotta Dreams:
Sweet & Savory: Whipped ricotta with a drizzle of honey, lemon zest, fresh thyme, and toasted pistachios.
Savory: Plain or whipped ricotta seasoned with salt, pepper, garlic powder, chopped parsley, and olive oil. Discover delicious ways to use ricotta cheese [Simulated Link URL].
Greek Yogurt Goodness:
Za’atar Yogurt: Thick Greek yogurt mixed with lemon juice, olive oil, and generous amounts of za’atar spice blend.
Tzatziki-Style: Greek yogurt mixed with grated cucumber (squeeze out excess water!), minced garlic, chopped dill, lemon juice, and olive oil. A perfect pairing based on this authentic tzatziki sauce recipe [Simulated Link URL].
Hummus Heaven:
Classic Plus: Smooth homemade hummus topped with paprika, olive oil, and warm, spiced chickpeas.
Vibrant Beet Hummus: Offers stunning colour and earthy sweetness, great with feta or goat cheese crumbles.
Rosemary White Bean: Creamy cannellini bean hummus infused with garlic and rosemary.
Cream Cheese Creations:
Herb & Garlic: Softened cream cheese blended with minced garlic, chives, parsley, and dill.
Lox Spread: Cream cheese mixed with chopped smoked salmon, capers, and red onion.
Goat Cheese Glory:
Whipped goat cheese (often blended with a touch of cream cheese or yogurt for smoothness) pairs wonderfully with fig jam, prosciutto, caramelized onions, or toasted walnuts.
C. Flavour Profile Inspirations: Themed Creations
Combine base, cream, and garnishes for cohesive themes:
Mediterranean: Yogurt or whipped feta base, topped with Kalamata olives, sun-dried tomatoes, chopped cucumber, fresh oregano, lemon zest. Explore more vibrant Mediterranean diet recipes [Simulated Link URL].
Italian: Ricotta or mascarpone base, topped with thin slices of prosciutto, fresh arugula, shaved Parmesan, and a drizzle of balsamic glaze (add toppings after cooking).
Indian-Inspired: Yogurt base swirled with cilantro-mint chutney, topped with spiced, crumbled paneer or roasted chickpeas, and fresh cilantro. Find inspiration in easy Indian appetizer recipes [Simulated Link URL].
Middle Eastern: Labneh or hummus base, generously sprinkled with za’atar, pomegranate seeds, fresh parsley, and toasted pine nuts.
**Sweet & Savory Fall: ** Whipped ricotta or goat cheese base, topped with thinly sliced fresh figs or pears, a drizzle of honey or maple syrup, toasted walnuts, and fresh thyme.
**Mushroom Lover’s: ** A base of herbed cream cheese or mascarpone topped with richly sautéed mushrooms and garlic, perhaps with some parmesan. Check out this recipe for creamy garlic mushrooms [Simulated Link URL] which could be adapted beautifully as a topping.
D. Adding Proteins & Cooked Veggies (Layered on Top)
Make it a more substantial meal by adding elements on top of the creamy spread:
Cooked Shredded Chicken (perhaps tossed with pesto or spices)
Spiced Ground Lamb or Beef
Grilled Shrimp
Flaked Salmon
Roasted Vegetables (bell peppers, zucchini, eggplant, cherry tomatoes) – Check out this guide on how to roast vegetables perfectly [Simulated Link URL].
Caramelized Onions
Sautéed Spinach and Garlic
Serving Suggestions: When and How to Enjoy
“The Creamy Flatbread” is incredibly versatile:
Perfect Appetizer: Cut warm flatbread into wedges or small squares for easy grabbing. Arrange attractively on a platter. Find more easy appetizer ideas here [Simulated Link URL].
Light Lunch or Dinner: Serve a whole flatbread per person, perhaps alongside a simple green salad with vinaigrette or a cup of easy tomato soup [Simulated Link URL].
Party Platter Star: Feature different creamy flatbread variations on a large grazing board alongside cheeses, charcuterie, olives, fruits, and nuts.
Side Dish Supreme: Offer slices instead of traditional bread alongside grilled chicken, kebabs, lamb chops, or hearty stews like chili or lentil soup.
Wine/Drink Pairings: Consider crisp white wines like Sauvignon Blanc or Pinot Grigio, a dry Rosé, or even a light-bodied Pinot Noir. Sparkling water infused with lemon, mint, or cucumber is also a refreshing non-alcoholic choice.
Storage and Reheating Guidelines
For the best experience, follow these storage tips:
A. Storing Components Separately (Highly Recommended)
Cooked Flatbread: Once completely cool, store leftover flatbread in an airtight bag or container at room temperature for 1-2 days. For longer storage, wrap well and freeze for up to 1-2 months.
Creamy Toppings: Store leftover creamy toppings (like whipped feta, seasoned yogurt, ricotta mixtures) in an airtight container in the refrigerator. Shelf life varies: yogurt/cheese-based toppings are typically best consumed within 3-5 days, while hummus might last slightly longer. Always check for freshness before using.
Flatbread Dough: Uncooked no-yeast dough can be wrapped tightly and refrigerated for 1-2 days. Yeasted dough can often be refrigerated for a slow cold ferment (consult specific recipe) or frozen (well-wrapped) after the first rise for later use (thaw in the fridge).
B. Storing Assembled Flatbread
This is generally not recommended as the flatbread will inevitably absorb moisture from the topping and become soggy. If you absolutely must store an assembled flatbread, wrap it tightly or place it in an airtight container in the refrigerator and plan to eat it within 24 hours. The texture will be compromised.
C. Reheating Flatbread
Bring stored flatbread toward room temperature first. Reheat briefly to restore warmth and some softness:
Dry Skillet: Heat over medium for a minute or two per side.
Oven/Toaster Oven: Warm at around 350°F (175°C) for a few minutes.
Air Fryer: A minute or two at a moderate temperature can work well.
Avoid the Microwave: It tends to make bread tough and chewy upon cooling.
It’s always best to add the fresh (refrigerated) creamy topping after reheating the flatbread.
Frequently Asked Questions (FAQs) – Your Creamy Flatbread Queries Answered
Here are answers to common questions about making “The Creamy Flatbread”:
Q1: Can I make the flatbread dough ahead of time?
A: Yes! No-yeast dough (like the yogurt version) can typically be made, wrapped well, and refrigerated for 1-2 days before rolling and cooking. Yeasted dough often benefits from a cold ferment in the fridge (check your specific recipe for timing) or can be frozen after its first rise, then thawed in the fridge before shaping.
Q2: How do I keep the flatbread from getting soggy?
A: The best way is to assemble just before serving. Ensure the flatbread is fully cooked. Use thicker creamy toppings if assembling slightly ahead. Avoid letting very wet toppings sit on the bread for long periods.
Q3: Can I make creamy flatbread gluten-free?
A: Yes, you’ll need to use a reliable gluten-free flour blend specifically designed for bread/pizza for the flatbread base (results will vary based on the blend). Ensure your creamy topping ingredients (cheeses, yogurts, etc.) are naturally gluten-free or certified GF if needed. Expect the texture of GF flatbread to differ from traditional wheat-based versions.
Q4: What’s the best way to cook the flatbread (pan-fry vs grill vs bake)?
A: Each method offers slightly different results:
Pan-Frying: Quickest, easiest cleanup, yields soft flatbread with nice browning. Great control.
Grilling: Adds smoky flavour and attractive char marks. Can cook very quickly.
Baking (High Heat): More hands-off, can yield a slightly crisper, more pizza-like crust, especially if using a stone.
Q5: Can I freeze leftover creamy flatbread?
A: It’s highly recommended to freeze the components separately (cooked flatbread wrapped well, creamy topping in its own container – though note dairy-based toppings might change texture slightly upon thawing). Freezing an assembled creamy flatbread is generally not advised, as the topping texture will suffer and the bread will likely become soggy upon thawing.
Q6: What are some easy creamy toppings besides whipped feta?
A: Plenty! Try plain or whipped ricotta (add lemon zest & honey!), thick Greek yogurt seasoned with salt, pepper, garlic powder, and dill, classic hummus, or softened cream cheese blended with fresh herbs and garlic. Even a simple homemade ranch dip [Simulated Link URL] could work!
Q7: Can I use store-bought flatbread or pita bread?
A: Absolutely! Using store-bought naan, pita bread, or other flatbreads is a fantastic shortcut. Just warm the bread according to package directions (or briefly in a pan/oven) before adding your homemade creamy topping and garnishes.
Conclusion: Embrace Your Inner Flatbread Artist
“The Creamy Flatbread” is more than just food; it’s an experience. It’s the joy of tearing into warm bread, the delight of cool, tangy creaminess, and the endless possibilities for personalization. We’ve journeyed through understanding its components, mastering a signature recipe, exploring pro tips, and diving into a world of variations. The key takeaway is its wonderful adaptability – simple enough for a Tuesday night, yet easily elegant enough for entertaining guests. It truly is one of the most versatile recipes perfect for entertaining [Simulated Link URL].
We hope this guide has demystified the process and inspired you to get creative in your own kitchen. Don’t be afraid to experiment with different flatbread bases, creamy concoctions, and flavour combinations. Find your perfect “Creamy Flatbread.” Now, it’s your turn to gather your ingredients, roll out some dough (or open a package!), whip up a creamy delight, and share the delicious results. Let us know your favourite combinations in the comments below!